The first bot I ever wrote made money for eleven days straight. On day twelve it lost everything it had earned, plus another 14% of the account, because I had never tested what it would do when the exchange API returned an error mid-trade. It kept re-buying the same position over and over. That lesson cost me around $900, and it taught me more than any tutorial ever did: a crypto trading bot is not a money printer. It is a piece of software that executes your decisions faster and more consistently than you can — including your bad decisions.
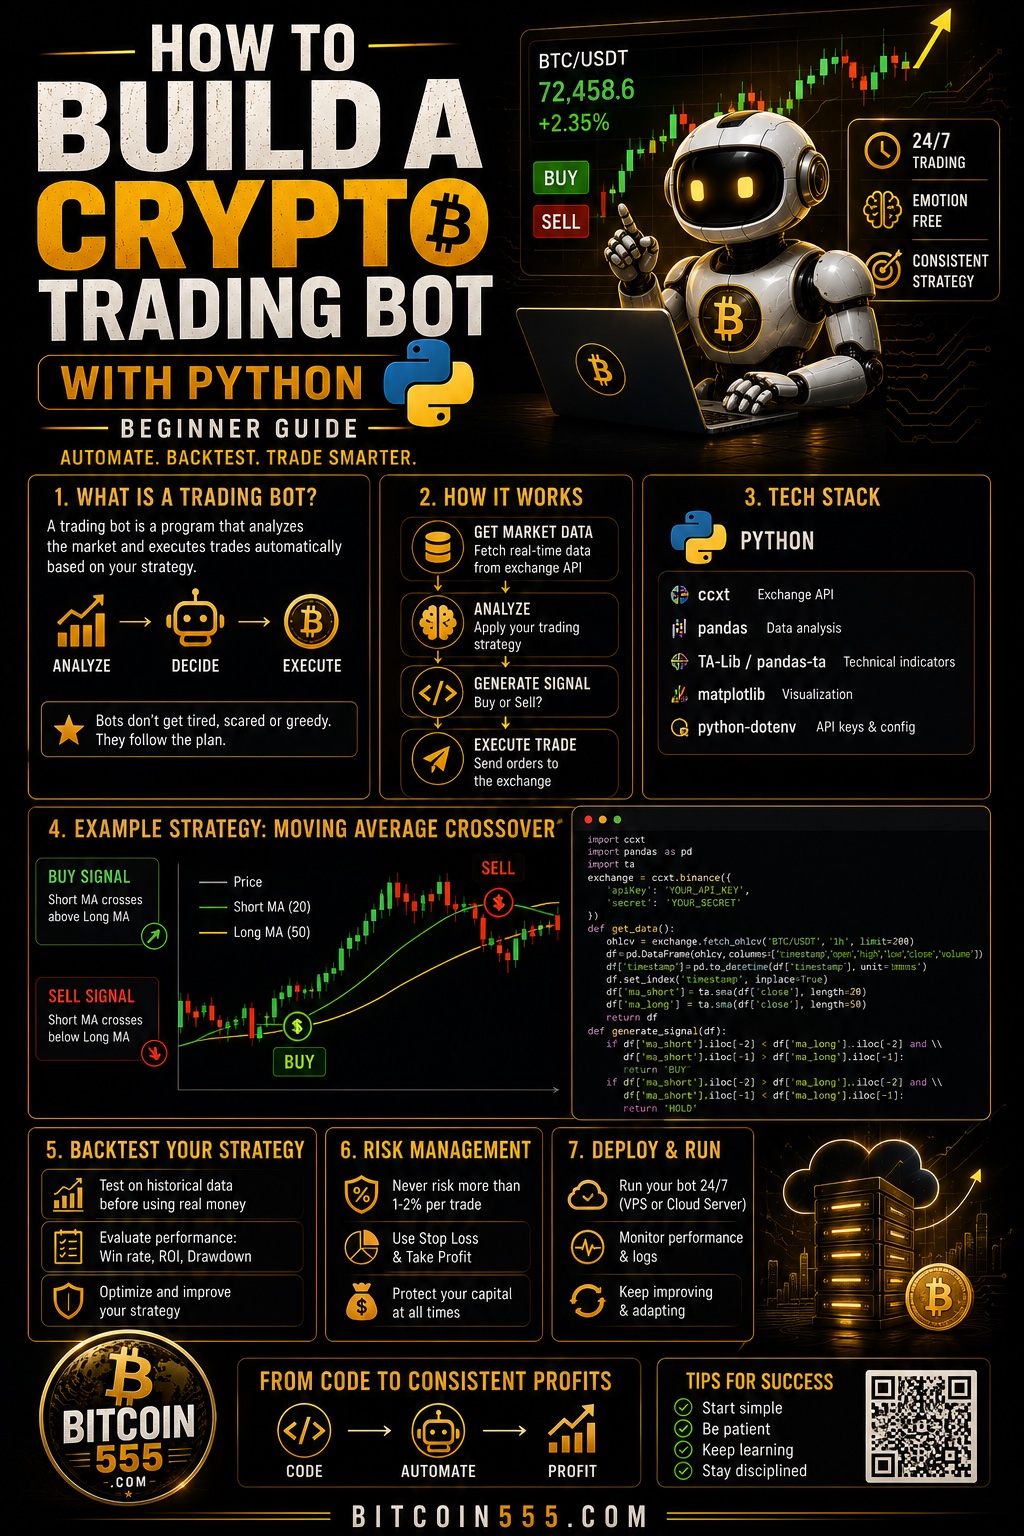
This guide walks you through how to build a crypto trading bot with Python the way I wish someone had shown me: strategy first, code second, and risk management wrapped around everything. You will not need a computer science degree. You will need patience, a small test account, and the discipline to paper trade before risking real money.
Why Build Your Own Trading Bot Instead of Buying One
The market is full of paid bots promising 5% a day. Almost all of them are either scams or curve-fitted strategies that worked on last year's data and fall apart on next month's. When you build your own bot, three things change:
- You understand every rule it follows. When it loses (and it will), you know exactly why and whether the loss was within expectations or a bug.
- You control the risk parameters. No black box deciding your position size.
- You can adapt it. Markets shift between trending and ranging regimes. A bot you built yourself can be modified in an afternoon.
There is also a harder truth: automation does not make a bad strategy profitable. If your manual trading loses money, a bot will simply lose money faster and without emotion. The realistic goal for a beginner bot is not to get rich — it is to execute a modest, well-tested edge consistently and to remove the two things that destroy most retail traders: revenge trading and hesitation.
What You Need Before Writing a Line of Code
Set up your environment properly before touching strategy logic. Here is the minimum stack that actually works:
- Python 3.10 or newer. Install it from python.org or use Anaconda if you prefer a managed environment.
- The ccxt library. This is the standard for connecting Python to crypto exchanges. It supports over a hundred exchanges through one unified interface, so your code is not locked to a single platform.
- pandas and numpy. For handling candle data and calculating indicators.
- An exchange account with API access. Binance is a common choice for bot builders because of its deep liquidity, low fees (0.1% spot, less with BNB discounts), and a well-documented API with a free testnet for paper trading.
- A separate API key with restricted permissions. This is non-negotiable. Enable trading only. Disable withdrawals. Restrict the key to your IP address if the exchange allows it.
One security point beginners skip: your bot only needs enough capital to trade. Keep your long-term holdings completely off the exchange. I keep trading capital on Binance and everything I do not intend to touch on a Ledger hardware wallet. If your API key ever leaks — and keys do leak, through compromised machines or careless GitHub commits — the attacker can only access what is on the exchange. A withdrawal-disabled key protects you further, but nothing protects cold storage like actual cold storage.
Install the core libraries with a single command: pip install ccxt pandas numpy. Then create a config file for your API keys and add it to .gitignore immediately. Hardcoded API keys pushed to public repositories are one of the most common ways beginner bot builders lose their funds. Bots scan GitHub for leaked keys within minutes of a commit.
Choosing a Strategy Your Bot Can Actually Execute
Beginners overcomplicate this. Your first bot should trade one pair, one timeframe, one simple rule set. Complexity is where bugs hide, and bugs cost real money.
Three beginner-appropriate strategy types
- Moving average crossover (trend following). Buy when a fast EMA crosses above a slow EMA, sell when it crosses back below. Wins big in trends, bleeds in choppy markets. Expect a win rate around 35-45% with the profits coming from a few large winners.
- RSI mean reversion. Buy when RSI drops below 30 on a ranging pair, sell when it returns above 50-55. Higher win rate (often 55-65%) but smaller wins, and it gets destroyed in strong downtrends unless you add a trend filter.
- Automated DCA (accumulation). Not really trading — the bot buys a fixed dollar amount on a schedule, optionally increasing size after larger drawdowns. This is the lowest-risk automation and a genuinely good first project. If you want to see what systematic accumulation has historically looked like before automating it, run some scenarios through a DCA calculator first — it will give you realistic expectations for what buying on a schedule actually produces over multi-year periods.
For this guide, we will use the EMA crossover because it teaches all the core concepts: fetching data, calculating indicators, generating signals, and managing positions.
Concrete strategy specification
Vague strategies cannot be coded. Here is a fully specified example on the BTC/USDT 4-hour chart:
- Entry: 21 EMA crosses above 55 EMA, confirmed at candle close. Enter long at the open of the next candle.
- Stop loss: 3% below entry, or below the most recent swing low, whichever is tighter.
- Take profit: 2R — twice the distance from entry to stop.
- Exit override: if 21 EMA crosses back below 55 EMA before the target, exit at market.
- Risk per trade: 1% of account equity.
Every one of those rules translates directly into an if-statement. That is what makes it a bot-ready strategy.
Building the Bot: Architecture Step by Step
A clean beginner bot has five components. Keep them in separate functions or files — you will thank yourself when debugging at 2 a.m.
1. Data fetching
Using ccxt, pulling recent candles is a few lines. You connect to the exchange, call fetch_ohlcv('BTC/USDT', timeframe='4h', limit=200), and load the result into a pandas DataFrame with columns for timestamp, open, high, low, close, and volume. Two hundred candles is enough to calculate a 55 EMA with stable values.
2. Indicator calculation
With pandas, EMAs are one-liners: df['ema_fast'] = df['close'].ewm(span=21).mean() and the same with span=55 for the slow line. No external TA library required for something this simple, which means fewer dependencies to break.
3. Signal logic
A crossover happens when the fast EMA was below the slow EMA on the previous closed candle and is above it on the current closed candle. Critical detail: always evaluate signals on closed candles only. If you check the live, still-forming candle, the EMAs will wobble and your bot will fire false signals, sometimes entering and exiting the same position multiple times in an hour. This single mistake accounts for a huge share of beginner bot losses.
4. Order execution and position sizing
Before sending any order, the bot calculates position size from risk. Here is the math with real numbers:
- Account equity: $5,000
- Risk per trade: 1% = $50
- Entry price: $40,000
- Stop loss: 3% below = $38,800 (distance of $1,200 per BTC)
- Position size: $50 ÷ $1,200 = 0.0417 BTC, roughly $1,667 of exposure
- Take profit at 2R: $40,000 + $2,400 = $42,400
Notice that the position is about a third of the account, but the actual amount at risk is only $50. If the stop hits, you lose 1%. If the target hits, you gain 2% ($100). With a 40% win rate — realistic for a trend system — the expectancy per trade is (0.40 × $100) − (0.60 × $50) = +$10 per trade before fees. That sounds small because it is. Over 200 trades a year it compounds into something meaningful, but nobody gets rich in a month running 1% risk. Anyone telling you otherwise is selling something.
5. State management and logging
Your bot must remember whether it is in a position, at what price, and where its stop sits — and this state must survive a restart. Store it in a small JSON file or SQLite database, not just in memory. Log every decision the bot makes: signal checked, order sent, order filled, error received. When something goes wrong, logs are the only way to reconstruct what happened.
Wrap all exchange calls in try/except blocks. APIs time out. Exchanges go into maintenance. Networks drop. Your bot's default behavior on any unexpected error should be to do nothing and alert you (a Telegram message via a simple bot token works well), never to retry an order blindly. My eleven-day disaster came from a bot that retried a failed buy order that had actually succeeded — five times.
Backtesting and Paper Trading: Prove It Before You Fund It
A strategy is a hypothesis until tested. The pipeline is: backtest on historical data, then paper trade live, then go live small.
Backtesting honestly
Download at least two to three years of 4-hour candles and simulate your rules candle by candle. Crucially, include realistic costs: 0.1% fee per side plus 0.05% slippage. On our example trade, that is roughly $2.50 in costs per round trip on $1,667 of exposure — which turns the naive +$10 expectancy into about +$7.50. Many strategies that look profitable without fees are net losers with them. If your edge disappears when you add costs, you never had an edge.
Look beyond total return. The numbers that matter:
- Maximum drawdown. If the backtest shows a 25% drawdown, expect 35%+ live. Can you stomach that without pulling the plug at the worst moment?
- Number of trades. Fewer than 100 trades in your test period means your results are statistical noise.
- Longest losing streak. A 40% win rate system will routinely hit 6-8 consecutive losses. At 1% risk that is a 6-8% drawdown, which is survivable. At 5% risk per trade it is a 30-40% hole, which usually ends with the trader abandoning a perfectly functional system.
Paper trading on testnet
Binance offers a spot testnet with fake funds and a real API. Run your bot there for at least four to six weeks. You are not testing profitability at this stage — six weeks proves nothing statistically. You are testing plumbing: does the bot handle partial fills, API errors, restarts, and weekends without human intervention? Only when it runs for weeks without a single manual fix should real money enter the picture.
Going live small
Start with an amount whose total loss would annoy you but not hurt you — $200 to $500 is sensible. Run it for two to three months. Compare live fills against what your backtest logic would have done on the same candles. Divergence means slippage or bugs, and both need fixing before you scale.
Risk Management: The Part That Actually Keeps You Alive
Everything above is mechanics. This section is survival. Hard rules I have learned to never break:
- Risk 0.5-1% of equity per trade. Recalculate position size from current equity before every entry, so risk shrinks automatically during drawdowns.
- Set a daily kill switch. If the bot loses 3% of equity in one day, it stops trading and messages you. Cascading failures — a bug plus a volatile market — are how accounts die in hours.
- Cap total exposure. If you later run multiple pairs, limit combined open risk to 3-4% of equity. Crypto pairs are heavily correlated; five open longs in a crash behave like one giant position.
- Sweep profits off the exchange. Monthly or quarterly, withdraw a portion of gains to cold storage. Moving profits to a Ledger hardware wallet converts theoretical bot performance into money that no exchange incident, API leak, or bot malfunction can touch.
- Never let the bot trade with leverage until it has been profitable on spot for at least six months. Leverage amplifies bugs just as efficiently as it amplifies gains.
Common Mistakes That Blow Up Beginner Bot Accounts
- Overfitting the backtest. Tweaking parameters until the historical curve looks perfect (21/55 EMA becomes 19/52 because it earned 4% more) guarantees the strategy fails on new data. Test on one period, validate on a separate, untouched period.
- Trading the unclosed candle. Covered above, worth repeating: signals on live candles cause phantom entries and exits. Always wait for the close.
- No handling of partial fills. You send a market buy for 0.0417 BTC, only 0.031 fills, and your bot later tries to sell 0.0417. The exchange rejects it, the bot crashes, and you hold an unmanaged position overnight.
- Ignoring fees in expectancy math. A scalping strategy targeting 0.4% moves pays 0.2%+ in round-trip costs. Half your gross edge is gone before slippage. High-frequency ideas rarely survive retail fee structures.
- API keys with withdrawal permissions. There is no legitimate reason for a trading bot to withdraw funds. None.
- Running on your laptop. Laptops sleep, update, and reboot. A $5/month VPS keeps your bot online 24/7 and pays for itself the first time it manages a stop while your laptop is closed.
- Scaling up after a lucky streak. Three winning weeks is not proof. Increasing risk from 1% to 5% right before the strategy's normal losing streak arrives is the classic account killer. Scale based on months of data, not mood.
- No manual override plan. You need a documented, tested way to flatten all positions and stop the bot in under a minute. Write it down before you need it.
FAQ: Building a Crypto Trading Bot with Python
How much money do I need to start running a trading bot?
Technically, exchange minimums are around $10-20 per order. Practically, start with $200-500 of genuinely disposable capital after paper trading. At 1% risk per trade, a $500 account risks $5 per trade — small enough that mistakes are cheap tuition rather than disasters.
How much Python do I need to know?
Basic fluency: variables, functions, loops, if-statements, error handling with try/except, and comfort with pandas DataFrames. If you can write a script that reads a CSV, calculates an average, and prints results, you can build the bot in this guide within a few weekends. The hard part is not the code — it is the discipline around testing and risk.
Are trading bots legal?
In most jurisdictions, yes — automated trading on your own account is legal, and exchange APIs exist precisely for this purpose. Check your exchange's terms of service (Binance explicitly permits API trading) and remember that bot profits are taxable trading income in most countries. Keep clean logs; they double as tax records.
Can a beginner bot really be profitable?
Honestly? Most first bots lose money or roughly break even after fees, and that is a normal part of the learning curve. The realistic path is: first bot teaches you infrastructure, second bot teaches you strategy testing, and somewhere around the third iteration you may have something with a genuine small edge. Treat year one as paid education. Anyone promising a profitable bot in a weekend is lying to you.
Should my bot run on my computer or a server?
A server. A basic VPS from any major provider costs $5-10 per month, runs Linux, and stays online through your laptop's sleep cycles and power outages. Use systemd or a simple process manager to auto-restart the bot if it crashes, and make sure the bot reloads its saved state on startup so a restart never leaves a position unmanaged.
Conclusion: Build the System, Then Trust the Process
Building a crypto trading bot with Python is one of the best educations in trading you can give yourself — not because the bot will make you rich quickly, but because it forces you to define your rules precisely, test them honestly, and confront the statistics of your own strategy without ego. The trader who knows their system wins 42% of the time with a 2:1 reward-to-risk ratio, and has verified it across 300 backtested trades and three months of small live trading, is in a completely different league from someone clicking buy on gut feeling.
Start simple: one pair, one timeframe, one rule set, 1% risk. Paper trade on the testnet until the plumbing is boring. Go live with money you can lose entirely. Sweep profits to cold storage. And keep a journal of every change you make to the bot, because six months from now, the reasons behind your parameters will matter more than the parameters themselves.
The bot is not the edge. The process is the edge. The bot just executes it without fear, greed, or the need for sleep — which, done right, is more than enough.
Disclaimer: This article is for educational purposes only and is not financial advice. Trading cryptocurrencies involves substantial risk of loss. Never trade with money you cannot afford to lose.