Taking control of your Bitcoin and cryptocurrency security is one of the most important decisions you can make as an investor. While exchanges offer convenience, the old saying in the crypto world holds true: not your keys, not your coins. A hardware wallet puts you in complete control of your digital assets, and Ledger has established itself as one of the most trusted names in this space.
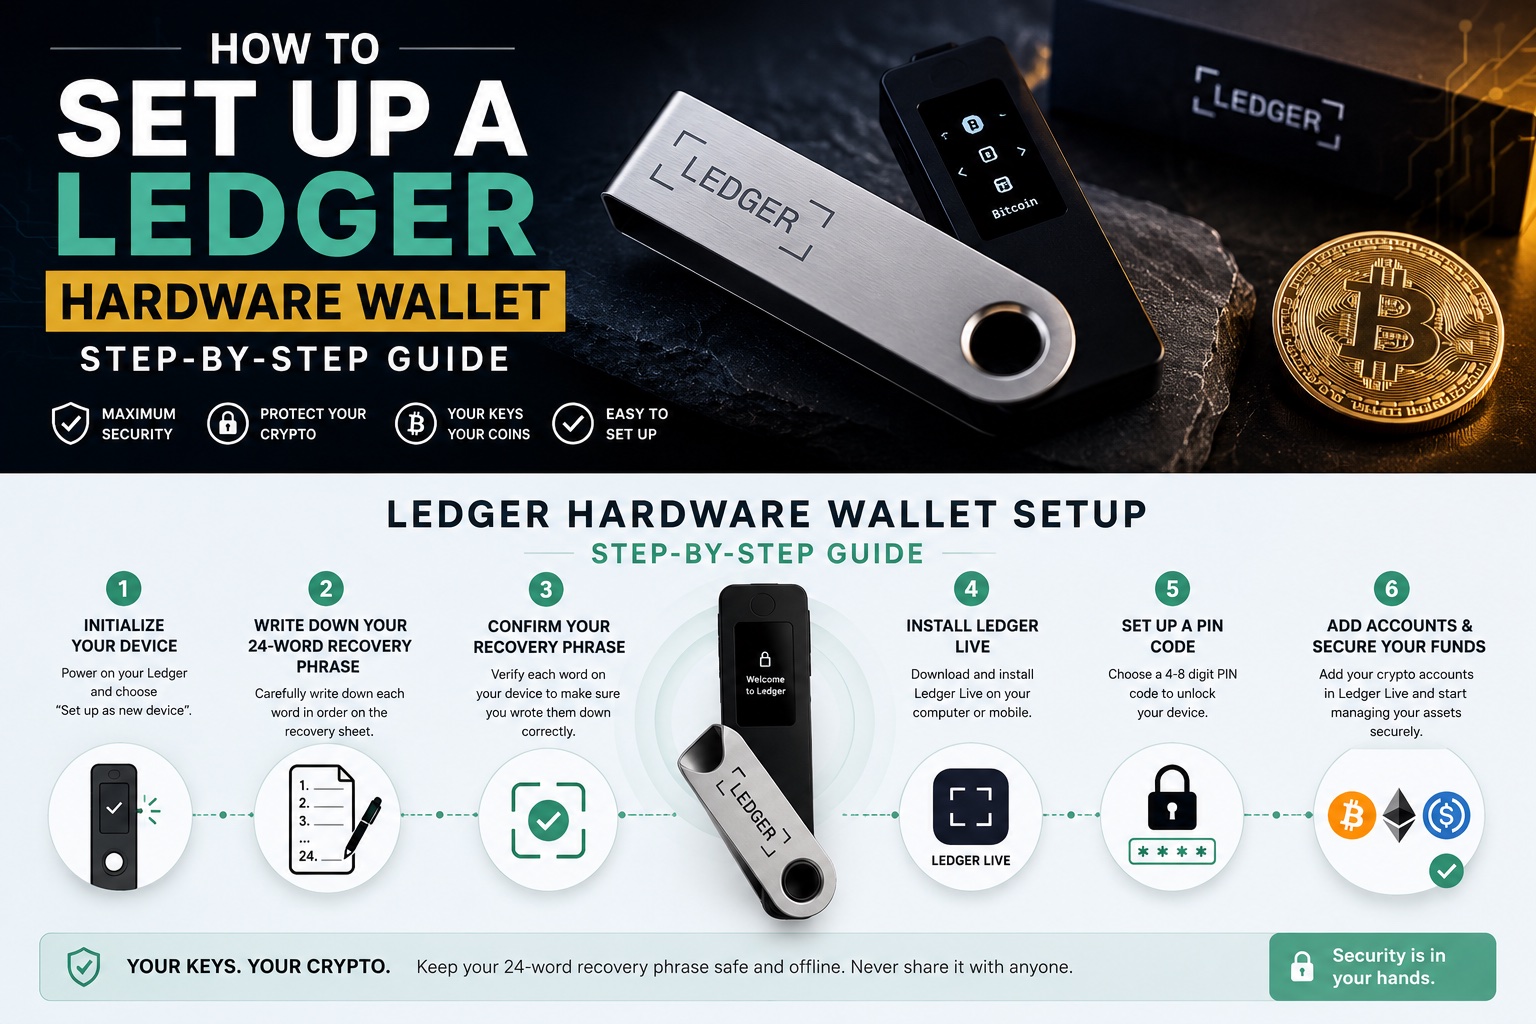
Setting up a hardware wallet might seem intimidating if you have never done it before, but the process is actually straightforward when you follow the right steps. In this comprehensive guide, I will walk you through everything you need to know about setting up your Ledger hardware wallet, from unboxing to transferring your first Bitcoin. By the end, you will have a fully configured cold storage solution that keeps your crypto safe from online threats.
Understanding What a Ledger Hardware Wallet Actually Does
Before diving into the setup process, it helps to understand why hardware wallets exist and how they protect your assets. A hardware wallet is a physical device that stores your private keys offline, completely isolated from internet-connected devices that hackers could potentially compromise.
Your private keys are the cryptographic proof that you own your Bitcoin and other cryptocurrencies. When these keys are stored on a computer or smartphone, they become vulnerable to malware, phishing attacks, and other security threats. A hardware wallet eliminates these risks by keeping your keys in a secure chip that never exposes them to your computer.
Ledger devices use a certified secure element chip, similar to what you find in credit cards and passports. When you want to send cryptocurrency, the transaction is signed inside the device itself. Your private keys never leave the hardware wallet, even when connected to a compromised computer.
Think of it like a bank vault that only you can access. Even if someone breaks into your house and steals your computer, your cryptocurrency remains safe because the keys needed to move those funds are locked inside your Ledger device and protected by your PIN code.
What You Need Before Starting the Setup Process
Proper preparation makes the setup process smooth and stress-free. Before you begin, gather everything you need and create the right environment for this important task.
Required items for setup:
- Your new Ledger hardware wallet (Nano S Plus, Nano X, or Stax)
- The USB cable included in the box
- A computer or smartphone with internet access
- The recovery sheet that comes with your device
- A pen (not pencil) for writing down your recovery phrase
- Approximately 30 to 45 minutes of uninterrupted time
Creating the right environment:
Choose a private location where no one can look over your shoulder or record your screen. This is crucial because you will be working with your recovery phrase, which is the master key to all your funds. Never set up your wallet in a public place like a coffee shop or coworking space.
Ensure your computer is secure and updated with the latest security patches. While the Ledger device itself is designed to be secure even on compromised computers, maintaining good general security practices is always wise.
Turn off any screen recording software and consider covering any webcams in the room. These precautions might seem excessive, but when it comes to securing potentially significant wealth, extra caution is warranted.
Step-by-Step Ledger Hardware Wallet Setup Instructions
Now let us walk through the actual setup process. I will use the Ledger Nano X as my primary example, but the steps are nearly identical for the Nano S Plus and Stax models.
Step 1: Download and Install Ledger Live
Ledger Live is the official companion application that allows you to manage your device and cryptocurrency portfolio. Navigate to the official Ledger website and download Ledger Live for your operating system. The application is available for Windows, macOS, Linux, iOS, and Android.
During installation, verify that you downloaded the software from the legitimate Ledger website. Phishing sites that mimic the official page have stolen funds from careless users. Double-check the URL before downloading anything.
Once installed, open Ledger Live and accept the terms of service. The application will guide you through the device setup wizard.
Step 2: Connect and Initialize Your Device
Connect your Ledger device to your computer using the provided USB cable. For Nano X users, you can also set up via Bluetooth, but I recommend using the cable for the initial setup as it tends to be more reliable.
Press both buttons on your device simultaneously to turn it on. You will see the Ledger logo appear on the screen. Use the left and right buttons to navigate through the on-screen instructions.
When asked whether to set up as a new device or restore from a recovery phrase, select Set up as new device. Only choose the restore option if you are recovering a wallet from an existing recovery phrase.
Step 3: Create Your PIN Code
Your PIN code is the first line of defense protecting your device. Choose a PIN between 4 and 8 digits that you can remember but that others cannot easily guess. Avoid obvious combinations like your birthday, 1234, or repeating numbers.
Use the buttons to select each digit and confirm by pressing both buttons together. You will need to enter the PIN twice to confirm it. This PIN will be required every time you turn on your device or wake it from sleep mode.
Write your PIN down and store it separately from your recovery phrase. If someone obtains both your device and PIN, they can access your funds. If someone obtains your recovery phrase, they do not even need your device.
Step 4: Write Down Your Recovery Phrase
This is the most critical step in the entire setup process. Your Ledger will display a 24-word recovery phrase, one word at a time. This phrase is a human-readable backup of your private keys and can restore your entire wallet if your device is lost, stolen, or damaged.
Using the pen and recovery sheet included with your device, carefully write down each word in order. Double-check your spelling. A single incorrect letter could make your backup useless when you need it most.
After displaying all 24 words, your device will ask you to confirm specific words from your list. This verification step ensures you wrote everything down correctly. Take your time and verify each word carefully.
Critical recovery phrase rules:
- Never type your recovery phrase into a computer, phone, or any digital device
- Never take a photo or screenshot of your recovery phrase
- Never store it in cloud storage, email, or password managers
- Never share it with anyone, including Ledger support (they will never ask for it)
- Store the physical backup in a secure, fireproof location
Many experienced users create multiple copies stored in different secure locations, such as a home safe and a bank safety deposit box. Consider using a metal backup solution for protection against fire and water damage.
Step 5: Complete the Security Checklist
After confirming your recovery phrase, Ledger Live will present a security checklist. This quiz ensures you understand the key security concepts. Answer each question honestly, as this information protects your funds.
The checklist confirms that you chose your own PIN, wrote down your recovery phrase yourself, and understand that Ledger will never ask for your recovery words. Take this seriously because social engineering attacks that trick users into revealing their phrases are unfortunately common.
Installing Apps and Adding Cryptocurrency Accounts
With your device initialized, you need to install applications for each cryptocurrency you want to manage. Ledger devices have limited storage, so you might need to install and uninstall apps as needed. Do not worry though, uninstalling an app does not delete your funds or data.
Installing the Bitcoin App
In Ledger Live, navigate to the Manager section. Your device will ask you to allow Ledger Manager on the device screen. Press both buttons to confirm.
Search for Bitcoin in the app catalog and click Install. The app will download directly to your Ledger device. This process takes about 30 seconds to a minute depending on your connection speed.
You can install additional apps for Ethereum, Litecoin, and hundreds of other supported cryptocurrencies following the same process.
Creating Your First Account
After installing the Bitcoin app, go to the Accounts section in Ledger Live and click Add Account. Select Bitcoin from the list and click Continue.
Open the Bitcoin app on your Ledger device when prompted. Ledger Live will synchronize with the blockchain and create your account. You can customize the account name to help organize your portfolio, such as Bitcoin Savings or BTC Trading.
Your account is now ready to receive Bitcoin. Click Receive to generate your wallet address. Always verify that the address shown in Ledger Live matches the address displayed on your device screen before sharing it with anyone.
Transferring Bitcoin to Your Ledger Wallet
With your wallet configured, you can now transfer cryptocurrency from exchanges or other wallets. If you have been keeping Bitcoin on an exchange like Binance, moving it to your Ledger is the logical next step for improved security.
Receiving Your First Transfer
In Ledger Live, select your Bitcoin account and click Receive. Your device will display the receiving address on its screen. Verify that this address exactly matches what Ledger Live shows. This verification step protects against clipboard hijacking malware that could replace addresses.
Copy the verified address and paste it into the withdrawal form on your exchange account. For your first transfer, I strongly recommend sending a small test amount first. Send perhaps 0.001 BTC or the minimum withdrawal amount. Wait for the transaction to confirm before sending larger amounts.
Once you see the test transaction in your Ledger Live account, you can confidently transfer larger amounts. This small precaution has saved countless users from sending funds to incorrect addresses.
Best Practices for Large Transfers
When moving significant amounts of Bitcoin, always verify the receiving address on your device screen before confirming the transaction on the exchange. Take your time. The urgency you feel is exactly what scammers exploit.
Consider breaking very large transfers into multiple transactions. While this incurs additional fees, it limits your risk if something goes wrong with any single transaction.
Maintaining Your Ledger Wallet Long Term
Setting up your wallet is just the beginning. Proper maintenance ensures your security remains strong over time.
Firmware Updates
Ledger regularly releases firmware updates that improve security and add features. When Ledger Live notifies you of an available update, install it promptly. Connect your device, open the Manager, and follow the update instructions.
Keep your recovery phrase accessible during updates. While rare, updates can occasionally require you to restore your device. Having your backup ready eliminates any stress from this process.
Regular Security Audits
Periodically verify that your recovery phrase backup is intact and legible. Check that your storage location remains secure and that the paper or metal has not degraded. Some users schedule annual reviews of their cryptocurrency security practices.
Review your account activity in Ledger Live regularly. Unfamiliar transactions could indicate a compromised recovery phrase, though this would be unusual if you followed proper security protocols.
Physical Security
Treat your Ledger device with appropriate care. While it is designed to be durable, avoid exposing it to extreme temperatures, moisture, or physical damage. When traveling, keep it in your carry-on luggage rather than checked bags.
Consider whether you want others to know you own a hardware wallet. Publicly discussing your cryptocurrency holdings can make you a target for physical theft or social engineering attacks.
Frequently Asked Questions About Ledger Setup
What happens if I lose my Ledger device?
Losing your device does not mean losing your cryptocurrency. Your funds exist on the blockchain, not on the physical device. As long as you have your 24-word recovery phrase, you can purchase a new Ledger or any compatible hardware wallet and restore complete access to your funds. This is why protecting your recovery phrase is far more important than protecting the device itself.
Can I use the same Ledger for multiple cryptocurrencies?
Absolutely. A single Ledger device can manage Bitcoin, Ethereum, and thousands of other cryptocurrencies simultaneously. You simply install the appropriate app for each cryptocurrency you want to use. The device storage limits how many apps you can have installed at once, but you can freely install and uninstall apps without affecting your funds or accounts.
Is it safe to buy a Ledger from third-party sellers?
For maximum security, purchase your Ledger directly from the official Ledger website or authorized resellers. Devices from unauthorized sellers could potentially be tampered with or pre-configured with recovery phrases known to scammers. If you do receive a device from any source, always set it up as a new device and generate a fresh recovery phrase. Never use a device that arrives with a recovery phrase already written down.
How often should I update my Ledger firmware?
Install firmware updates as soon as they become available and you have time to complete the process properly. Updates typically include security improvements and new features. Postponing updates leaves your device potentially vulnerable to newly discovered security issues. The update process usually takes less than 10 minutes.
Can someone access my funds if they steal my Ledger device?
A stolen device is protected by your PIN code. After three incorrect PIN attempts, the device wipes itself completely. The thief would then need your recovery phrase to restore access, which they should not have if you followed proper security practices. This is why storing your recovery phrase separately from your device is essential.
Conclusion: Your Cryptocurrency Security Foundation
Setting up a Ledger hardware wallet represents a significant step forward in your cryptocurrency security journey. By taking control of your private keys, you have eliminated the risks associated with keeping funds on exchanges and reduced your exposure to online threats.
The initial setup process requires attention to detail, particularly when handling your recovery phrase. This careful approach pays dividends in peace of mind and actual security. Your Bitcoin and other cryptocurrencies now rest in a solution designed specifically to protect them.
Remember that security is not a one-time task but an ongoing responsibility. Keep your firmware updated, protect your recovery phrase backup, and maintain awareness of potential threats. With these practices in place, your Ledger hardware wallet will serve as the foundation of your cryptocurrency security for years to come.
As your portfolio grows, you might explore additional features like passphrase protection or multi-signature setups. The security habits you build today will scale with your needs. Welcome to the world of true cryptocurrency self-custody.